Gardening Made Simple.
Are you ready to grow your own fresh, flavorful garlic this year? Planting Garlic in Spring might sound unusual, but it’s a simple way to enjoy a bountiful harvest by the fall.
Imagine the satisfaction of adding homegrown garlic to your meals—rich in taste and packed with health benefits. You’ll discover easy steps to plant garlic successfully, avoid common mistakes, and get the best results even if you’re a beginner. Keep reading to unlock the secrets of spring garlic planting and transform your garden into a tasty, fragrant haven.
Choosing the right garlic variety is key for a strong spring harvest. Different types of garlic grow better in certain climates and soils. Knowing the differences helps you pick the best fit for your garden. This way, you get healthy bulbs with great flavor.
Hardneck garlic has a stiff central stalk. It grows well in cooler climates. Hardneck types often have bigger cloves and stronger taste. They produce flower stalks called scapes that you can eat.
Softneck garlic has no hard stalk. It grows better in warmer areas. Softneck garlic stores longer and has more cloves. It is the type sold in most grocery stores.
Spring planting suits certain garlic types best. For cold areas, try hardneck varieties like Rocambole or Purple Stripe. They handle frost well and taste rich. In warmer zones, softneck types like Silverskin or Artichoke do great. These types grow fast and store well.
Good seed garlic ensures healthy plants. Buy from trusted nurseries or local farms. Avoid garlic from supermarkets; it may carry disease. Look for firm bulbs with no soft spots. Choose certified disease-free garlic for best results.
Preparing the soil is a key step before planting garlic in spring. Healthy soil helps garlic grow strong and produce big bulbs. Good soil conditions give garlic the nutrients and water it needs.
Take time to prepare the soil well. This will make your planting more successful. Follow these simple tips to get the soil ready for garlic.
Garlic grows best in loose, well-drained soil. Sandy loam or loamy soil is ideal. Heavy clay soil can hold too much water and cause bulbs to rot.
The soil pH should be between 6.0 and 7.0. This range helps garlic absorb nutrients easily. Test your soil pH with a home kit or ask a local garden center.
Adding organic matter improves soil structure and fertility. Mix compost or well-rotted manure into the soil. This adds nutrients and helps soil drain better.
Avoid fresh manure. It can burn young garlic roots. Work the amendments deeply into the soil to a depth of 8 inches. This helps roots grow freely.
Choose a sunny spot for planting garlic. Garlic needs at least 6 hours of sunlight each day. Avoid low areas where water collects.
Good air circulation reduces disease risks. Keep the planting site free from weeds and old plant debris. Clean soil helps garlic thrive.
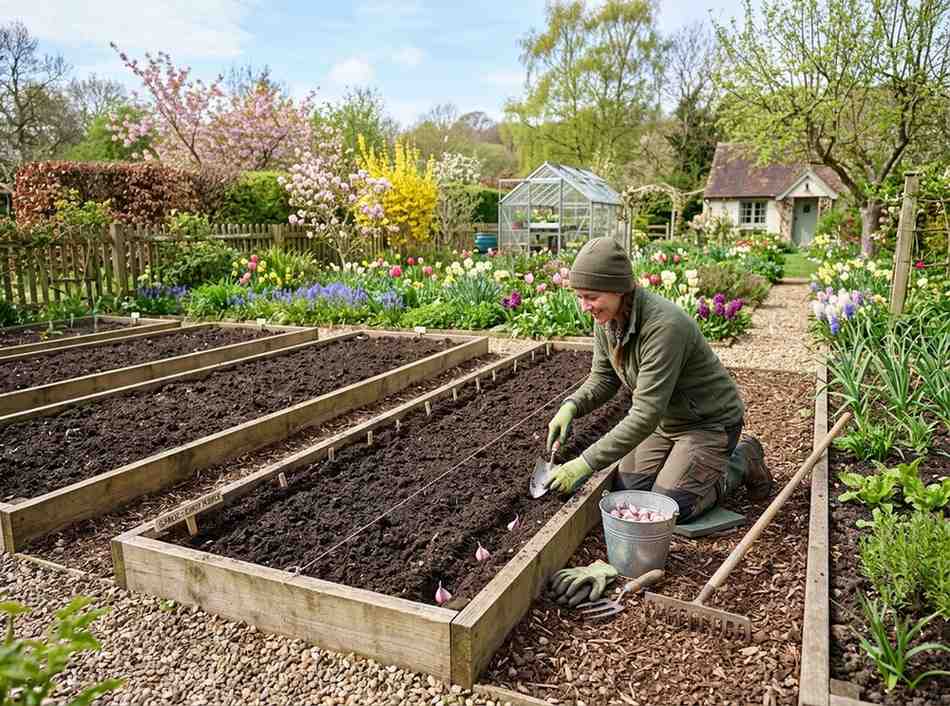
Planting garlic in spring needs careful steps for a good harvest. The right techniques help garlic grow strong and healthy. Knowing how to plant, where to place cloves, and how to prepare them makes a big difference. These tips will guide you through simple steps for planting garlic in spring.
Plant garlic after the last frost in your area. The soil should be warm but not hot. Early spring is best, usually March or April. Planting too early can cause cloves to rot. Planting too late may stop growth before summer.
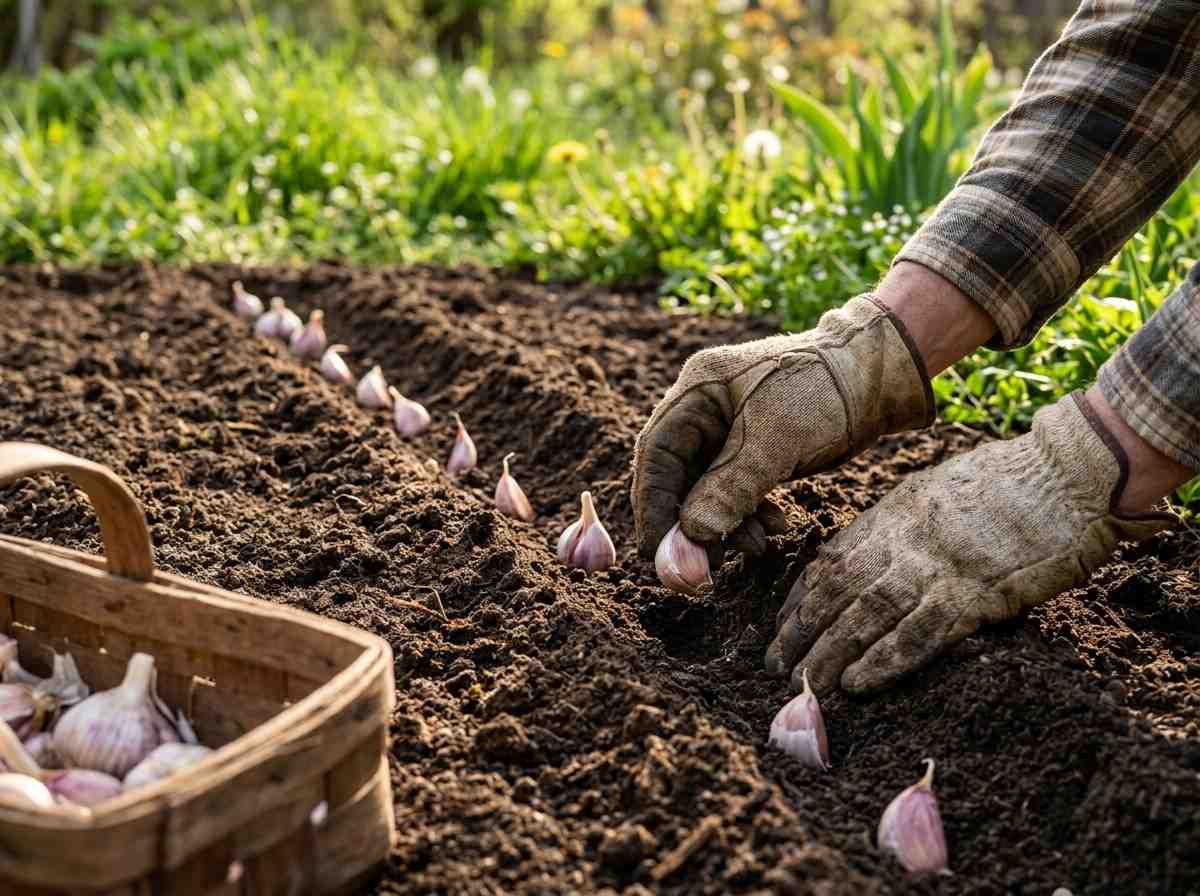
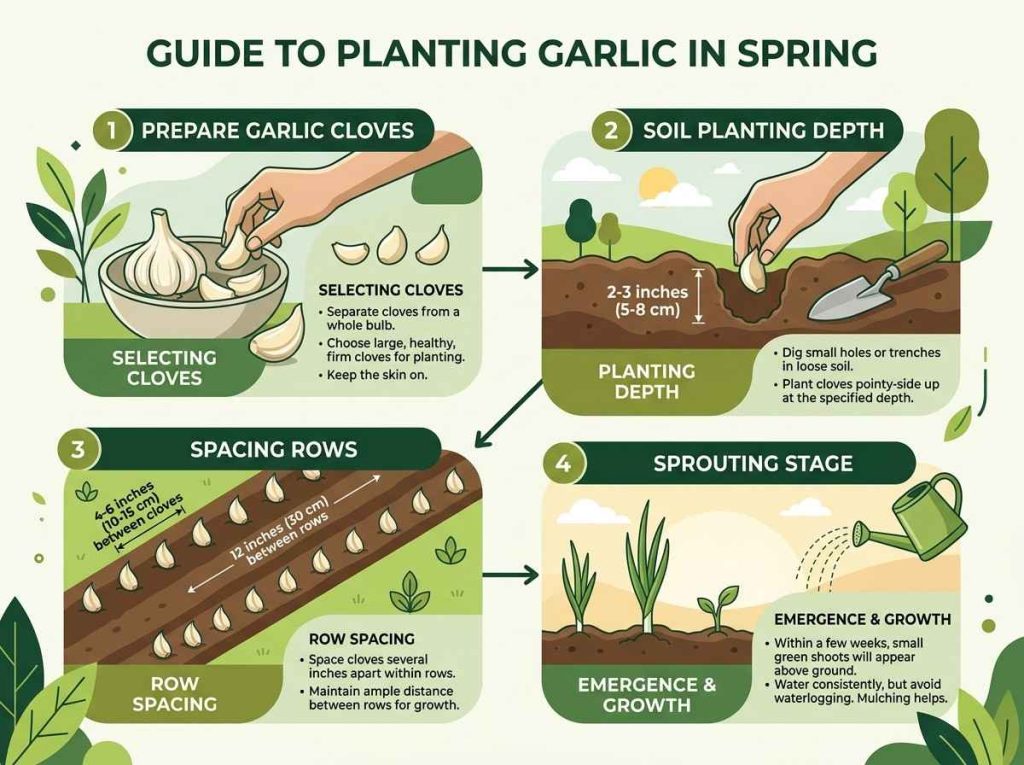
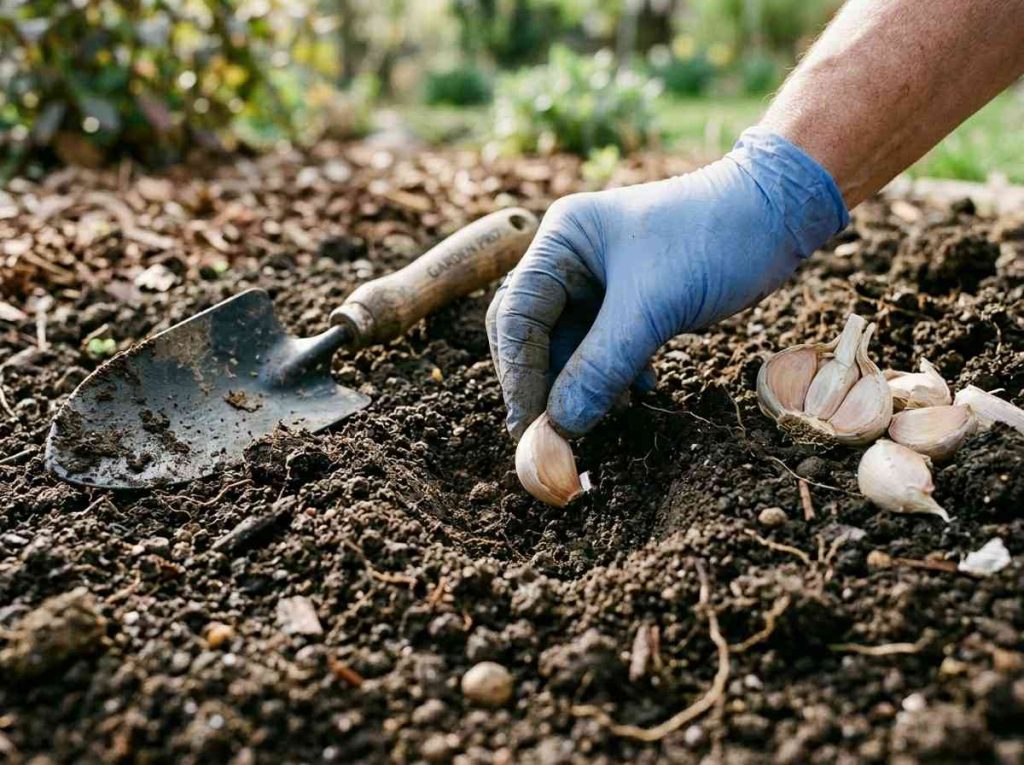
Plant each clove 4 to 6 inches apart. Leave about 12 inches between rows. Plant cloves with the pointy end up. Cover them with 2 inches of soil. Too deep planting slows growth. Too shallow planting can dry out roots.
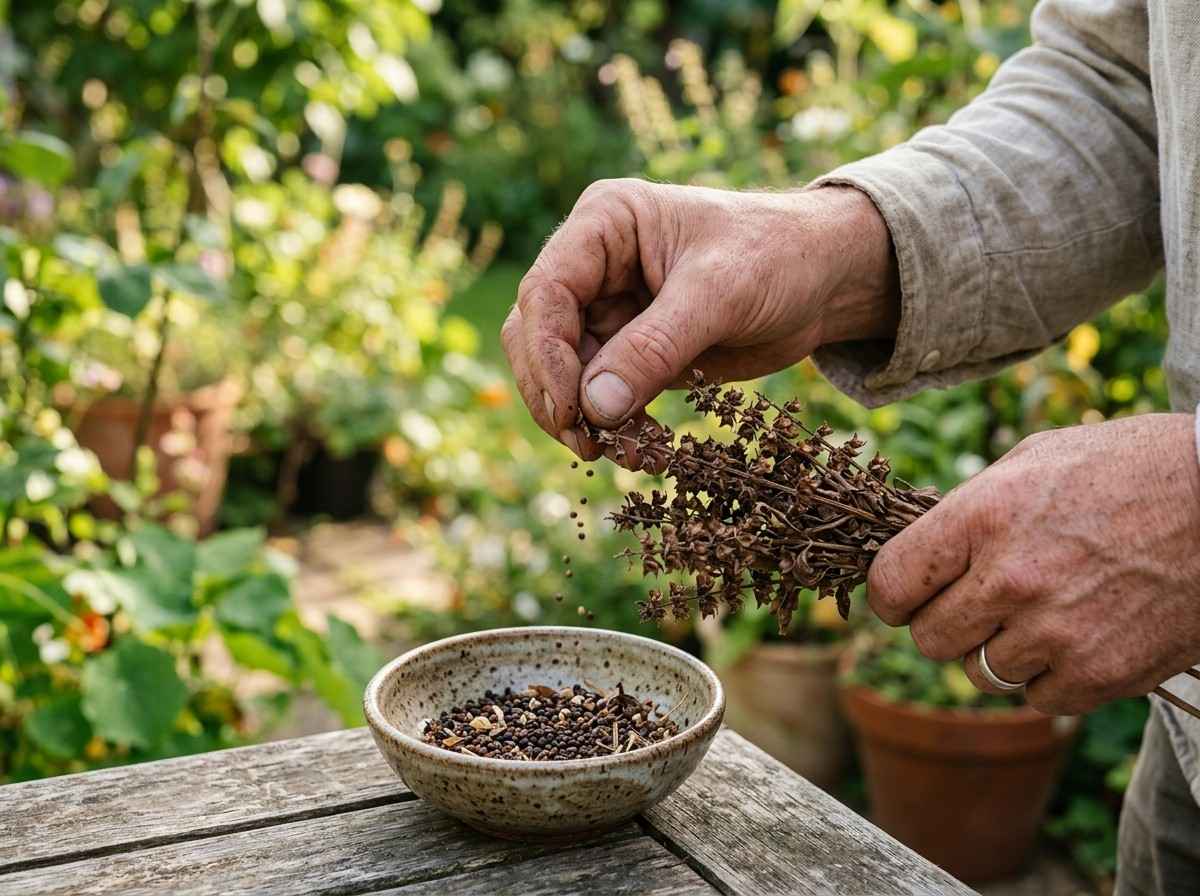
Pick large, healthy garlic cloves for planting. Avoid small or damaged cloves. Break the bulb carefully into cloves before planting. Do not peel the cloves. Let the cloves dry for a day before planting. This helps prevent mold and rot.
Watering and fertilizing are key to growing healthy garlic in spring. Proper care helps garlic develop strong bulbs and good flavor. Keep soil moist but not soggy. Use the right fertilizer at the right time. Mulching can also protect moisture and add nutrients.
Garlic needs regular watering to grow well. Water the plants deeply once or twice a week. The soil should stay damp but not wet. Avoid overwatering to stop root rot. Water early in the day to reduce disease risk. Check soil moisture by touching it. Dry soil can slow garlic growth.
Use a balanced fertilizer with nitrogen, phosphorus, and potassium. Nitrogen helps leaves grow strong. Apply fertilizer at planting and again in early spring. Avoid too much nitrogen late in the season. It can cause soft bulbs. Organic fertilizers like compost or fish emulsion work well. They improve soil health over time.
Mulch keeps the soil moist and cool. It stops weeds from growing near garlic. Use straw, leaves, or grass clippings as mulch. Mulch also adds organic matter to the soil. This helps garlic roots absorb nutrients better. Apply mulch after planting and water it well. Mulching reduces the need for frequent watering.
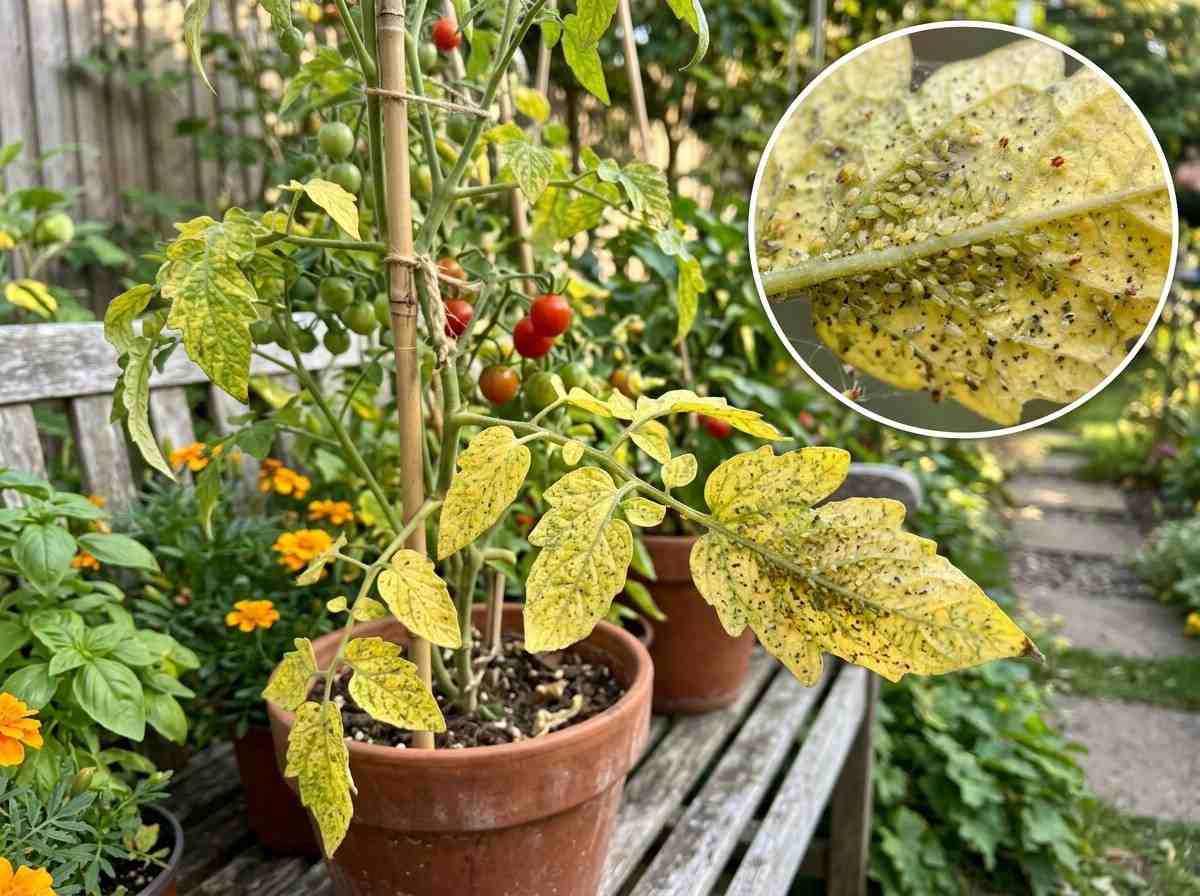
Planting garlic in spring brings many rewards. Healthy garlic depends on good pest and disease control. Pests and diseases can damage garlic plants and reduce your harvest. Early care helps avoid big problems later. Understanding common pests and diseases helps keep garlic strong and productive.
Garlic faces several pests that harm leaves, bulbs, and roots. Onion thrips are tiny insects that suck plant juices. They cause silver streaks on leaves and weaken plants. Bulb mites attack garlic bulbs, making them soft and rotten. Nematodes are microscopic worms that damage roots and stunt growth. Birds and rodents may also dig up bulbs and eat them.
Start with healthy seed garlic free from disease. Rotate crops yearly to stop disease buildup in soil. Avoid planting garlic in wet or poorly drained soil. Water plants early in the day to dry leaves quickly. Remove and destroy infected plants to prevent spread. Keep garden tools clean to avoid spreading disease. Good air flow between plants helps reduce fungal problems.
Use neem oil spray to control many insect pests safely. Diatomaceous earth sprinkled around plants kills soft-bodied pests. Garlic sprays made from crushed garlic can repel insects. Introduce beneficial insects like ladybugs to eat harmful pests. Apply compost tea to boost plant health and resist disease. Always test organic treatments on a few plants first.
Harvesting and storing garlic properly keeps it fresh and tasty. Knowing when to pick garlic and how to store it helps avoid waste. Good care after harvest makes garlic last for months.
Garlic is ready to harvest when leaves turn yellow and dry. Usually, this happens 7 to 8 months after planting. Check the lower leaves first. If half or more are brown, it is time to harvest.
Another sign is the size of the bulbs. Gently dig a bulb and check its size. Bulbs should be full and firm. Soft or small bulbs need more time in the ground.
Use a garden fork or shovel to loosen the soil around garlic. Dig carefully to avoid damaging the bulbs. Pull the bulbs out by their stems gently.
Do not pull hard on the leaves. Damaged bulbs do not store well. After harvesting, brush off soil but do not wash the bulbs. Washing adds moisture, which can cause rot.
Hang garlic in a dry, shaded place with good air flow. This process is called curing. It takes about 2 to 3 weeks. Curing helps the garlic dry and last longer.
Once dry, trim the roots and cut the stalks about one inch above bulbs. Store garlic in a cool, dark, and dry spot. Avoid places that are too warm or humid.
Mesh bags, paper bags, or baskets work well for storage. Check garlic bulbs regularly and remove any that show signs of mold or softness.
Planting garlic in spring can be rewarding but sometimes brings challenges. Knowing how to spot and fix common problems helps your garlic grow strong and healthy. This section covers key issues gardeners face and ways to handle them effectively.
Yellow leaves often signal a nutrient problem or watering issue. Garlic needs balanced soil nutrients, especially nitrogen. Too little nitrogen causes leaves to yellow and weaken. Overwatering also leads to yellow leaves by suffocating roots. Check soil moisture and avoid waterlogged ground. Add compost or fertilizer if soil looks poor. Healthy green leaves mean your garlic is thriving.
Small or misshapen garlic bulbs result from several causes. Crowded planting restricts bulb growth. Give cloves enough space, about 4-6 inches apart. Garlic needs full sun for strong bulbs. Planting in shade weakens growth. Poor soil quality also limits bulb size. Use loose, well-drained soil rich in organic matter. Correct planting depth matters too. Plant cloves 2 inches deep to protect and nourish them.
Mold and rot damage garlic bulbs and roots quickly. These issues happen in wet, poorly drained soil. Avoid watering garlic too much. Ensure good airflow by spacing plants properly. Remove any infected plants immediately to stop spread. Use clean tools and fresh soil each season. Crop rotation helps prevent disease buildup. Healthy plants resist mold and rot better.
Plant garlic early in spring, as soon as the soil is workable and not frozen.
Plant cloves about 2 inches deep with the pointed end facing up for best growth.
Loose, well-drained soil rich in organic matter works best for garlic planting.
Water garlic regularly to keep soil moist but not soggy, about once a week.
Yes, garlic grows well in containers if they have good drainage and enough sunlight.
Planting garlic in spring brings fresh flavor to your garden. Garlic grows best in loose, well-drained soil. Give your garlic enough space to grow strong bulbs. Water regularly but avoid overwatering to keep roots healthy. Watch for pests and remove weeds often.
With patience, your garlic will be ready to harvest in a few months. Enjoy the satisfaction of homegrown garlic in your meals. Simple steps lead to tasty results. Start planting today and see your garden thrive.