
Gardening Made Simple.
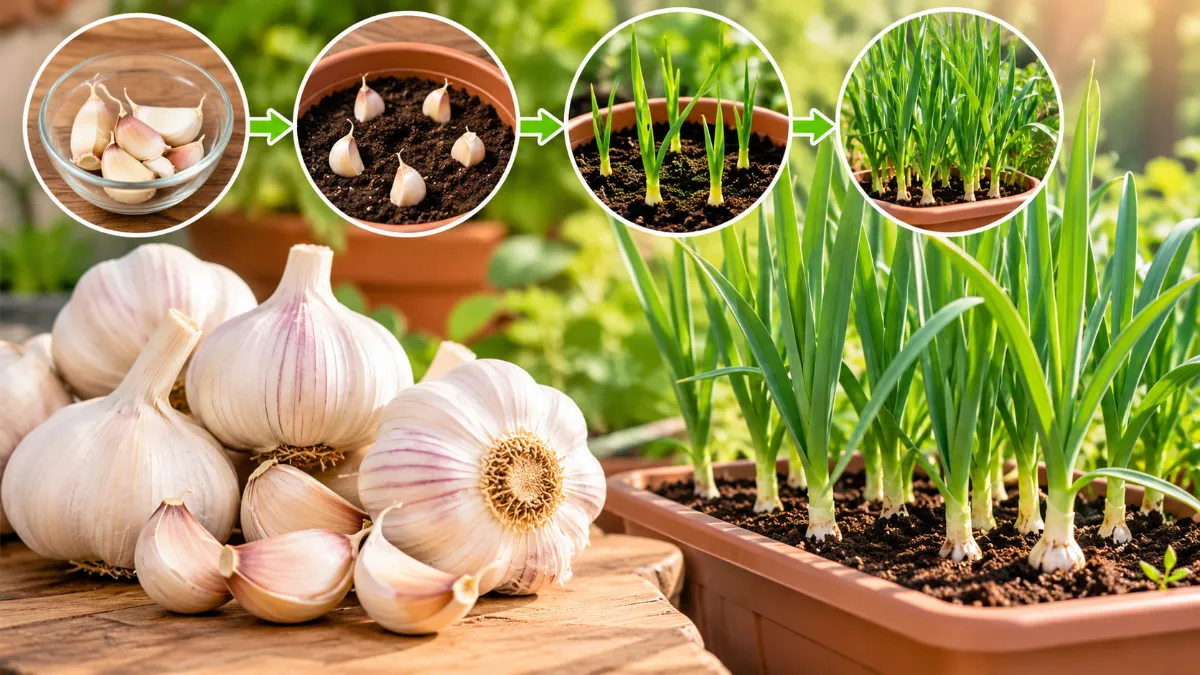
How to grow garlic at home becomes much simpler when you plant individual cloves in autumn and give them a sunny, well-drained bed. As a result, each clove can develop into a full bulb by mid-summer. The essential details are timing, planting depth, steady spring moisture and proper curing after harvest.
For most gardeners, the best starting point is a large, healthy clove from a garden center. However, grocery store garlic may have been treated to prevent sprouting, so it often performs less reliably in a home garden.
Quick growing summary:
Garlic should usually be planted in autumn, about 2 to 4 weeks after the first frost. In many regions, that means October through November. This schedule gives the cloves enough time to establish roots before winter without encouraging excessive top growth.
Timing matters because garlic needs a long growing period. During the coldest part of winter, the cloves remain dormant, then resume growth as spring temperatures rise. Therefore, a rushed spring planting may still produce garlic, but the bulbs can be smaller.
Gardeners in warm climates may need to imitate winter conditions before planting. To do that, place the garlic bulbs in a refrigerator for 8 to 10 weeks, then plant the individual cloves when the soil and local weather are suitable.
Meanwhile, keep the bulbs dry while they are being chilled. Do not separate the cloves until planting day because the papery skin helps protect each clove from damage and moisture loss.
The right bed saves time throughout the season. First, choose a sunny location that receives at least 6 to 8 hours of direct sunlight daily. Garlic grows best in loose, fertile, well-draining soil where water does not remain around the bulbs.
A soil pH of 6.5 or higher is suitable for garlic. If the soil is heavy or compacted, loosen it before planting and work in mature compost. In addition, avoid a low spot that stays wet after rain because poor drainage can weaken the roots and damage developing bulbs.
Separate the garlic bulb into individual cloves immediately before planting. At the same time, keep the papery skin intact on every clove. Select firm, large cloves without soft spots, mold or visible damage.
Large cloves generally provide a stronger starting point than small cloves. However, size alone is not enough. A large clove from a weak or damaged bulb may perform poorly, so sound condition matters just as much.
Garlic from a garden center is usually a better choice than ordinary supermarket garlic. For that reason, check the source carefully because grocery store bulbs may be treated to stop sprouting, which can make them unsuitable for reliable garden growth.
To plant garlic at home, press each clove into prepared soil with the flat root end facing downward and the pointed sprout end facing upward. Then cover the clove with 1 to 2 inches of soil in moderate climates or up to 2 to 4 inches in colder regions.
Planting orientation affects how easily the shoot reaches the surface. Although a sideways or upside-down clove may still grow, the emerging shoot has to correct its direction underground. Consequently, that uses energy that could otherwise support early root and leaf development.
| Planting detail | Recommended measure | Practical reason |
|---|---|---|
| Clove depth | 1 to 2 inches | Suitable for moderate conditions |
| Cold-region depth | Up to 2 to 4 inches | Provides extra protection from winter cold |
| Clove spacing | 4 to 6 inches | Leaves room for bulb development |
| Row spacing | 12 inches | Makes weeding and harvesting easier |
After planting, cover the bed with 2 to 6 inches of straw, shredded leaves or clean hay. This mulch insulates the soil during winter, reduces weed competition and helps limit sharp swings in soil temperature.
However, do not pack wet mulch tightly against the cloves. Instead, use a loose, even layer that protects the bed while allowing air movement. In a small urban garden, a narrow mulched row can be easier to manage than a large open bed because every clove remains accessible.
Garlic needs consistently moist soil during spring growth. Water deeply enough to moisten the root zone, then allow excess water to drain. As a result, the soil should not remain saturated between watering sessions.
As the bulbs begin to mature, gradually reduce watering. Then stop completely about 2 to 3 weeks before harvest. Dry conditions at this stage help the outer layers form and reduce the risk of harvesting damp bulbs that do not store well.
Apply nitrogen-rich fertilizer or mature compost in early spring. This supports healthy leaf growth while the plant is building its energy reserves. However, stop feeding as the bulbs begin to swell because late nitrogen can encourage leafy growth when the plant should be finishing the bulb.
A simple schedule is useful in a busy garden. For example, feed once in early spring, monitor leaf growth and avoid adding more fertilizer when the bulb base becomes noticeably enlarged.
Hardneck garlic produces curly flower stems called scapes in late spring or early summer. Therefore, snip these stems when they curl to redirect the plant’s energy toward bulb development.
Use clean scissors and cut the scape near the upper leaves. Still, removing the stem is not necessary for every garlic type, so first confirm that the plant is hardneck garlic. The scapes are also edible when harvested young and tender.
Garlic is usually ready in mid-summer, often during June or July. Instead of waiting for the entire plant to turn brown, look at the lower leaves. Harvest when the bottom leaves become yellow or brown while about 5 or 6 green leaves remain.
Those remaining green leaves become protective layers around the bulb. Consequently, harvesting too early can produce smaller bulbs with less developed wrappers. On the other hand, waiting too long can cause the outer layers to break down, leaving the cloves less protected during storage.
Loosen the soil gently with a garden fork or shovel. Insert the tool beside the plant rather than directly under the bulb, then lift the whole plant carefully.
Do not yank the foliage. Otherwise, pulling hard can tear the stem away from the bulb or bruise the cloves beneath the soil. In compact urban beds, loosening a short section at a time gives better control and reduces accidental damage.
After lifting the plants, brush off excess dirt without washing the bulbs. Next, move them to a cool, dry, shaded and well-ventilated area for 2 to 4 weeks. Curing allows the outer skin and neck to dry, which improves storage life.
Spread the bulbs in a single layer or hang small bundles where air can circulate. Meanwhile, avoid direct sunlight, damp corners and enclosed containers during curing. A garage, covered balcony or dry shed can work if the space is shaded and has steady ventilation.
When the curing period is complete, trim the roots and cut back the dried foliage. Handle the bulbs gently because bruises may not be visible immediately. Ultimately, a properly cured bulb should feel firm, with dry outer skin and a dry neck.
The Royal Horticultural Society’s garlic-growing reference offers an additional horticultural source for gardeners who want to compare planting and harvesting practices.
The most efficient approach is to plan the garlic bed backward from harvest. First, mark the autumn planting window, then reserve space for spring feeding, summer drying and a shaded curing area. This prevents the common mistake of growing healthy bulbs without having a suitable place to finish them.
Many disappointing harvests come from small planning errors rather than difficult growing conditions. In particular, the mistake that wastes the most time is planting supermarket garlic without checking whether it can sprout. Starting with suitable planting stock gives the crop a better foundation.
Yes. A single healthy clove can develop into a full garlic bulb when planted in suitable soil with the root end down and enough space to expand.
It may sprout, but grocery store garlic can be treated to prevent sprouting. Therefore, garden-center garlic is a more dependable choice for planting.
Garlic grows best with at least 6 to 8 hours of direct sunlight each day. In practice, a bright, unobstructed bed usually produces stronger growth.
Daily watering is not required. Instead, keep the soil consistently moist during spring, then stop watering 2 to 3 weeks before harvest.
Scapes are curly flower stems produced by hardneck garlic. Cut them in late spring or early summer to direct more energy toward bulb growth.
Allow garlic to cure for 2 to 4 weeks in a cool, dry, shaded and well-ventilated place before trimming and storing the bulbs.
Successful garlic growing follows a clear seasonal rhythm: prepare a sunny bed, plant sound cloves in autumn, protect them with mulch, support spring growth and reduce water before harvest.
When the lower leaves turn yellow or brown, lift the bulbs gently and give them enough time to cure. Although that final 2-to-4-week step is easy to overlook, it is what turns a fresh harvest into garlic that is ready for careful storage.
Subscribe to the blog and newsletter to get new updates in simple, clear words straight to your inbox.
Recent Articles
Related Articles
Keengarden is your simple, friendly guide to growing healthy plants, fixing garden problems, and choosing the right tools.
© 2025 keengarden. All rights reserved. Designed by Affpilot