
Gardening Made Simple.
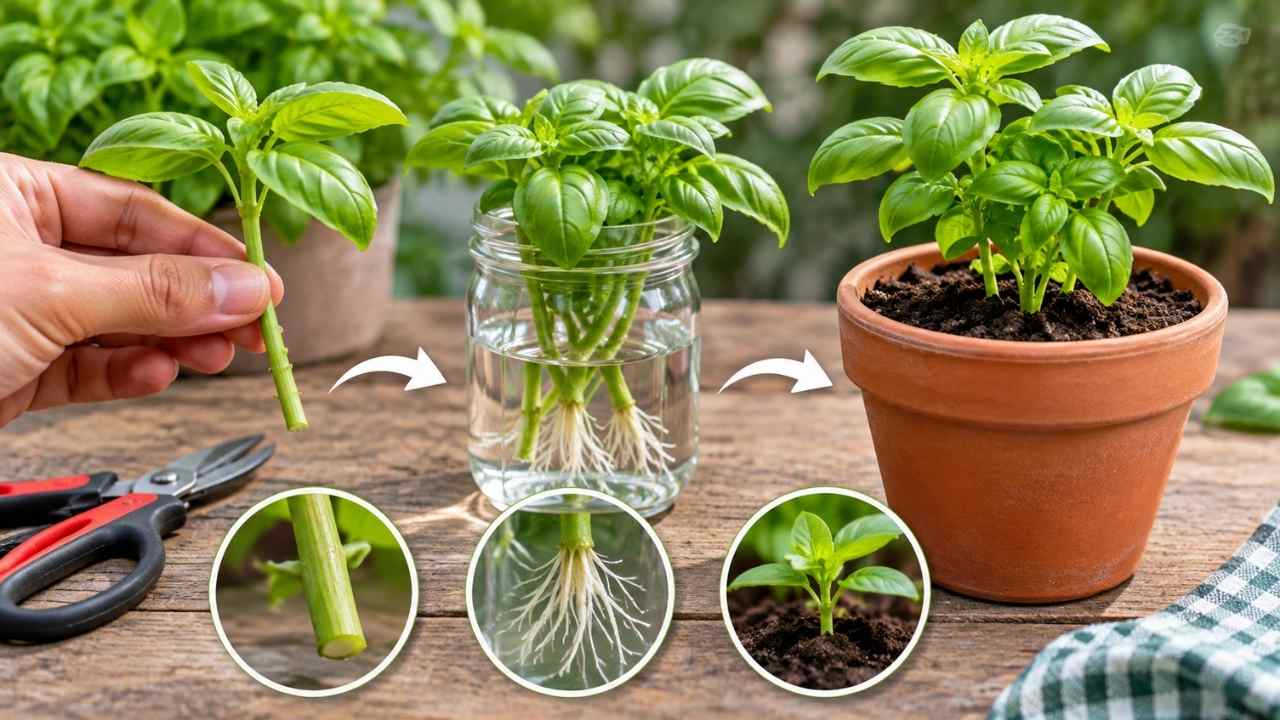
How to grow basil from cuttings is one of the quickest ways to create new basil plants at home. First, choose a healthy 4-to-6-inch stem, place its lower nodes in clean water, and move it to moist soil after roots reach 1 to 2 inches. With bright, indirect light and fresh water every 1 to 3 days, roots often appear within 3 to 10 days.
For UK and US gardeners, this method is especially useful when a basil plant becomes tall, crowded, or difficult to maintain. It also offers a practical way to preserve a vigorous plant without starting from seed. However, the key is not speed alone. The cutting must be prepared correctly so the submerged stem develops roots instead of rotting.
To grow basil from cuttings, cut a vigorous stem just below a leaf node, remove the lower leaves, and place the exposed nodes in clean water. Next, keep the upper leaves above the waterline, provide bright indirect light, and refresh the water every 1 to 3 days. Most healthy cuttings begin showing roots within 3 to 10 days.
A leaf node is the small bump where leaves attach to the stem. Usually, new roots develop from this area, which is why the cutting should be made just below a node. Therefore, select a stem that looks firm and green rather than soft, damaged, or already declining.
Flowering stems are less suitable because the plant is directing energy toward flowers and seeds. In contrast, a non-flowering stem with active leaf growth usually gives the cutting a stronger start. If the parent basil plant has several healthy stems, taking more than one cutting can improve the chance of success.
The best basil cutting is a 4-to-6-inch section from a vigorous, non-flowering stem. Make the cut just below a leaf node using clean, sharp scissors or pruning snips. As a result, a clean cut creates less crushed tissue while the nearby node provides the place where roots can form.
Look for a stem with healthy colour, firm texture, and no obvious signs of damage. However, avoid stems with blackened sections, severe wilting, or insect damage. You do not need a thick woody stem. In fact, a flexible green stem is usually easier to root in water.
Remove the leaves from the bottom 2 inches of the cutting. This prevents leaves from sitting underwater where they can decay and make the water foul. At the same time, leave only the top one or two sets of leaves so the cutting can continue photosynthesis without losing too much moisture.
If the cutting has very large leaves, removing one additional upper leaf may reduce stress. Still, do not strip the entire stem. The remaining leaves help the cutting produce energy while new roots develop.
Place the prepared basil stem in a clean jar or glass filled with clean, room-temperature water. Preferably, use non-chlorinated water, and make sure the lower nodes are submerged while the leaves remain above the surface. The container does not need to be deep. Instead, it only needs to support the stem securely.
Bright, indirect light is usually a safer choice than intense midday sun. A sunny windowsill can work, but strong direct sunlight may heat the water and increase stress. Therefore, a warm indoor spot with gentle light gives the cutting time to form roots without excessive moisture loss.
Change the water every 1 to 3 days. Fresh water reduces the chance of unpleasant odours and helps limit conditions associated with stem rot. If the lower stem becomes slimy, dark, or soft, discard that cutting and start again with a fresh, healthy stem.
| Water setup | Recommended approach | Reason |
|---|---|---|
| Water temperature | Room temperature | Reduces sudden temperature stress |
| Light | Bright and indirect | Supports leaves without excessive heat |
| Water refresh | Every 1 to 3 days | Helps keep the cutting environment cleaner |
| Submerged section | Lower nodes only | Encourages rooting while keeping leaves dry |
For general basil care, the Royal Horticultural Society’s basil growing guidance provides a useful reference. However, local growing conditions still matter. Indoor temperature, available light, and water quality can change how quickly a cutting develops.
Move a water-rooted basil cutting into soil when its roots are about 1 to 2 inches long. Roots may begin appearing within 3 to 10 days, although timing varies with light, warmth, stem health, and seasonal conditions. Waiting for a short network of roots gives the cutting a better chance of settling into potting mix.
Use a pot with drainage holes and moist, well-draining potting mix. First, make a narrow hole, place the roots inside, and press the mix gently around the stem. Avoid forcing the roots into a tight space because young water roots can be delicate.
Keep the newly potted basil evenly moist while it adapts. The soil should feel lightly damp rather than saturated. During the first few days, bright indirect light can reduce transplant stress. Later, gradually increasing light is sensible if the plant needs a brighter windowsill.
Consider a hypothetical cutting that develops several roots measuring between 1 and 2 inches after one week. In that situation, planting it in a small container of moist potting mix is reasonable. Keep the upper leaves above the soil and avoid burying unnecessary stem sections, which can remain damp and deteriorate.
Water propagation makes root development easy to observe while direct soil propagation can reduce the shock of moving a water-grown plant. For beginners, water is often the clearer option because root progress remains visible. However, a cutting moved too late may have long, fragile water roots that need gentle handling.
| Method | Advantages | Limitations | Best fit |
|---|---|---|---|
| Water first | Roots are visible and progress is easy to monitor | Requires a later transplant | Beginners and indoor growers |
| Direct soil | No water-to-soil transition | Root growth is harder to inspect | Growers comfortable managing moisture |
The water method is useful when you want a clear decision point. Once roots reach 1 to 2 inches, the cutting is ready for soil. On the other hand, direct soil propagation may suit someone who already has a well-draining mix and can maintain steady moisture without making the container waterlogged.
For a long-term planting plan, taking several cuttings at once can create staggered young plants. For example, starting three healthy stems a few days apart may reduce the risk of having every new plant reach transplant stage at the same time. Consequently, the staggered approach is practical for kitchens, windowsills, and small herb containers.
The most common failure is leaving too many leaves underwater. Submerged foliage breaks down quickly and can affect the stem. Another mistake is using a flowering or visibly weak stem. Even if such a cutting produces roots, it may begin with less energy than a vigorous non-flowering stem.
Temperature and light can also explain different results. For instance, a cutting placed in a cold, dim location may root more slowly than one kept in a warm area with bright indirect light. That does not automatically mean the method has failed. Instead, inspect the stem before deciding whether to restart.
Water propagation suits people who have an existing healthy basil plant and want new plants without buying seed or another mature plant. It works well for indoor kitchens, windowsills, and small containers. In addition, the method is useful when a basil plant has become leggy and needs selective pruning.
It may be less suitable when the only available stem is diseased, badly damaged, or already rotting. Cuttings also need regular attention during the rooting period. If nobody can change the water for several days, the stem may not remain in ideal condition.
Keep expectations realistic. Rooting within 3 to 10 days is a useful guideline, not a fixed guarantee. Seasonal light, indoor temperature, water cleanliness, and the condition of the parent plant all influence the result.
Yes. A healthy basil stem can develop roots in clean water when its lower nodes are submerged and its leaves stay dry. Bright indirect light supports the process.
Roots often begin appearing within 3 to 10 days. However, the exact timing depends on stem health, warmth, light, water quality, and the condition of the parent plant.
Bright indirect light is the safer starting point. Although a sunny windowsill may work, intense heat can stress the cutting and warm the water.
Change the water every 1 to 3 days. As a result, fresh, clean water helps reduce foul odours and limits conditions that may encourage stem deterioration.
Submerge the lower nodes, not the leaves. Therefore, removing foliage from the bottom 2 inches keeps leaves out of the water and gives the stem a cleaner rooting area.
Transplant the cutting when its roots are about 1 to 2 inches long. Use moist, well-draining potting mix and a container with drainage holes.
A dark or slimy lower stem can indicate deterioration. If possible, remove affected material. Otherwise, discard the cutting and restart with a healthy non-flowering stem.
Learning how to grow basil from cuttings gives you a repeatable way to create young plants from one healthy source. The process is simple, but each detail matters: choose the right stem, keep leaves above water, refresh the water regularly, and transplant at the right root length.
For the best long-term result, label the date each cutting enters water. This small habit helps you track the 3-to-10-day rooting window and notice when a cutting is developing unusually slowly. Before planting, verify that the roots are close to 1 to 2 inches and the stem remains firm.
Information such as local growing conditions, container recommendations, and plant-care guidance can change with context.Therefore, before making large planting plans, confirm current advice with a reputable horticultural source such as a local extension service or the Royal Horticultural Society.
Start with one healthy cutting if you are testing the method. Once the process feels manageable, stagger additional cuttings so new basil plants are available at different stages of growth.
Subscribe to the blog and newsletter to get new updates in simple, clear words straight to your inbox.
Recent Articles
Related Articles

Keengarden is your simple, friendly guide to growing healthy plants, fixing garden problems, and choosing the right tools.
© 2025 keengarden. All rights reserved. Designed by Affpilot