
Gardening Made Simple.
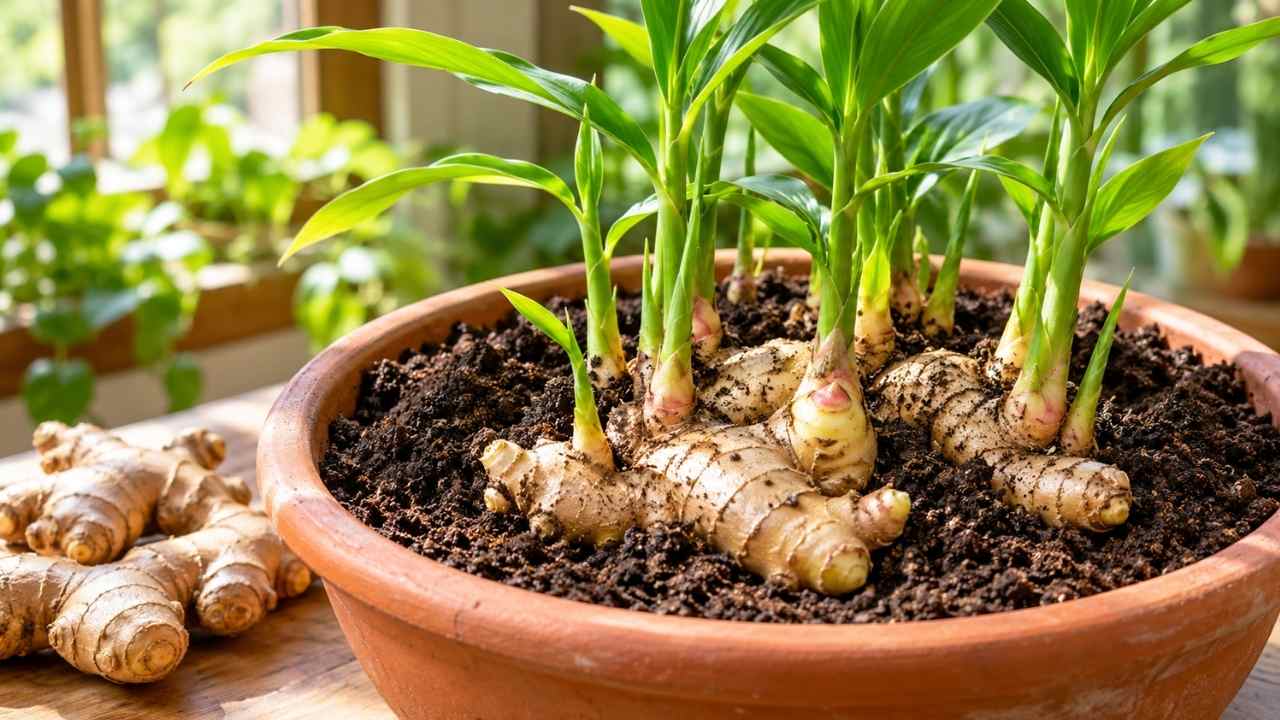
How to grow ginger at home starts with one healthy rhizome, a suitable container and careful watering. First, choose a firm piece of ginger with visible eyes, place it in a wide, shallow pot filled with loose, well-draining soil, then keep it warm and lightly moist. As a result, shoots usually appear within 2 to 4 weeks. Baby ginger can be harvested after about 4 months, while mature rhizomes generally need 8 to 10 months.
Ginger grows differently from carrots or potatoes. Instead, its rhizomes spread sideways beneath the soil, so container width matters more than depth. In practice, the most common failure is not poor light but excess water before sprouting. Therefore, a simple planting setup, indirect sunlight and patience can produce fresh ginger for cooking without needing a large garden.
Key points:
To grow ginger at home, begin with a firm rhizome, a wide pot and a rich potting mix that drains quickly. The eyes should face upward when the ginger is planted, while the rhizome remains only lightly covered. In addition, warmth and humidity encourage growth, but direct midday sunlight can dry the container too quickly or scorch young leaves.
A practical setup includes a pot at least wide enough for the rhizome to spread, drainage holes underneath and a location with filtered or indirect light. Organic ginger is often preferred because some conventionally grown roots may have been treated with sprout-inhibiting chemicals. Still, any root should be checked carefully for firmness, mould and healthy buds before planting.
The best planting material is a plump, firm ginger root with several visible eyes. These small bumps are dormant buds that can produce green shoots. Therefore, avoid pieces that feel soft, shrivelled or wet, because they may rot before roots develop. A root with multiple healthy eyes can also be divided into sections, provided each section has at least one viable bud.
Organic ginger is a useful choice when available. Conventional ginger may sometimes be treated with growth inhibitors, which can delay sprouting. However, the label alone does not guarantee success. Firm texture and visible buds are stronger practical signs. If the root has been refrigerated for a long time, give it extra time to wake up after planting.
Soak the selected piece in warm water for 24 hours. This step is commonly used to wash away surface residues and encourage dormant buds to begin activity. Use comfortably warm water rather than hot water, and discard the water after soaking. Afterwards, the ginger should remain firm, not slimy or discoloured.
A wide, shallow pot is better than a narrow, deep pot because ginger rhizomes spread horizontally. Choose a container with several drainage holes so excess water can escape after irrigation. For example, a grow bag, trough or broad patio planter can work well when it is stable and wide enough for the rhizome to expand.
Fill the container with a rich, loose potting mix amended with compost. The mix should hold some moisture without becoming muddy. By contrast, heavy garden soil can compact around the rhizome and restrict drainage, especially in a container. If the pot sits inside a decorative cachepot, empty collected water rather than allowing the base to remain submerged.
| Growing requirement | Practical choice | Why it matters |
|---|---|---|
| Container shape | Wide and shallow | Allows sideways rhizome growth |
| Drainage | Several open holes | Reduces the risk of root rot |
| Soil texture | Loose potting mix with compost | Balances moisture, air and root movement |
| Light level | Indirect or filtered sunlight | Supports shoots without excessive drying |
Container size should match the number of pieces being planted. One large rhizome needs room to expand without pressing against the pot wall. Consequently, crowding several pieces into a small container may produce thin growth and make watering less consistent.
Lay the soaked ginger flat on the soil surface with the eyes pointing upward. Cover it with roughly 0.5 to 1 inch of soil. The buds may remain slightly exposed or sit just beneath the surface, but burying the rhizome deeply can slow emergence and increase the chance of rot.
For a simple hypothetical example, imagine planting one palm-sized rhizome in a broad container. Instead of placing it upright in the centre, lay it across the soil so its buds have room to send shoots upward and its new rhizomes can spread sideways. This orientation reflects the plant’s natural growth pattern.
Do not press the soil down hard. Loose soil gives emerging shoots a clearer route to the surface and helps water move through the container. In addition, marking the planting date on a label can make it easier to judge whether the root is simply slow or showing signs of trouble.
Water the soil lightly after planting, then wait until the surface begins to dry before watering again. Overwatering before sprouts appear is one of the main causes of failure because a dormant rhizome cannot use much moisture. Therefore, the soil should feel slightly damp rather than wet or heavy.
Once green shoots appear, water more regularly while still allowing excess water to drain away. Ginger prefers a warm, humid position with indirect or filtered sunlight, such as a bright windowsill away from harsh midday rays. Meanwhile, a warm indoor location can be useful in cooler climates, while a sheltered outdoor position may work during reliably warm weather.
Shoots commonly emerge in 2 to 4 weeks, although timing can vary with temperature, root condition and moisture. If no shoot appears after four weeks, inspect the surface gently rather than digging up the whole pot. However, a sour smell, soft texture or darkening rhizome suggests excessive moisture or decay.
For recognised horticultural guidance on container growing and plant care, consult the Royal Horticultural Society. Its general growing advice can help you adapt watering and light practices to your local conditions in the UK or US.
Baby ginger can often be harvested after about 4 months. At this stage, the rhizomes are younger, tenderer and usually less fibrous than mature ginger. If the plant is still actively growing, harvest only an outer section. To do so, carefully expose the soil near the edge, snap off a small piece and cover the remaining rhizome again.
For a full mature harvest, wait approximately 8 to 10 months. The leaves usually turn yellow and die back as the plant finishes its growth cycle. At that point, lift the rhizome gently, remove loose soil and allow the harvested pieces to dry briefly before storing them in a cool, dry place.
| Harvest type | Approximate timing | What to expect |
|---|---|---|
| Baby ginger | About 4 months | Tender rhizomes with a milder texture |
| Mature ginger | About 8 to 10 months | More developed rhizomes with firmer skin |
Harvest timing is not identical in every home. Cooler rooms, limited light and a slow-starting rhizome can extend the growing period. Therefore, if the leaves die back much earlier than expected, check whether the container has stayed too wet, too cold or exposed to a sudden environmental change.
Most ginger-growing problems come from an unsuitable container, excess moisture or poor planting material. Correcting these issues early is easier than trying to rescue a rotting rhizome. Ultimately, the goal is steady growth, not constant watering or aggressive feeding.
A useful diagnostic rule is to check the root before changing everything else. If it is firm and the soil drains well, patience may be all that is needed. On the other hand, if it is soft or smells unpleasant, reducing watering alone may not reverse the damage.
Use the widest practical container rather than focusing on depth. This gives developing rhizomes more room and makes partial harvesting easier. Also, keep the pot in one stable location, because repeated movement between hot sun and cool shade can create uneven moisture and temperature conditions.
Ginger also benefits from a consistent routine. Check the soil with a finger before watering, rotate the container occasionally if growth leans toward the window and remove only damaged leaves. These small actions are more useful than adding water or fertiliser on a fixed schedule without checking the plant.
For gardeners in cooler regions, starting ginger indoors can protect the dormant rhizome from low temperatures. In warmer areas, filtered outdoor light and shelter from heavy rain may be sufficient. Overall, the best location is the one that combines warmth, humidity, drainage and manageable light rather than simply the brightest spot available.
Yes. Choose a firm supermarket rhizome with visible eyes. Organic ginger may sprout more readily when conventional roots have been treated with growth inhibitors.
Lay the rhizome flat with the eyes facing upward. This matches its sideways growth pattern and gives new shoots a clear route toward the surface.
Ginger shoots commonly appear within 2 to 4 weeks. However, cooler conditions, an older root or inconsistent moisture can slow emergence.
Excess moisture is a common cause. Use drainage holes, a loose potting mix and light watering until green shoots appear.
Ginger generally performs better in indirect or filtered sunlight. A warm, bright windowsill is suitable, while harsh midday sun may dry the pot quickly.
Harvest baby ginger after about 4 months or wait 8 to 10 months for mature rhizomes. Yellowing and dying leaves usually indicate maturity.
Yes. For baby ginger, remove an outer piece carefully and cover the remaining rhizome with soil. As a result, the plant can continue developing.
Successful home ginger growing depends on matching the plant’s natural habits: horizontal rhizome growth, warm conditions, filtered light and careful moisture control. A firm root with healthy eyes gives the process a strong start, while a wide container prevents the crowding that often limits development.
Begin with one or two pieces rather than filling several pots at once. That makes it easier to observe watering, sprouting and harvest timing in your own indoor or outdoor conditions. Before planting, confirm any local growing guidance through a trusted horticultural source, especially if your climate is cool or unusually wet.
Information check and update note: Growing times, local conditions and suitable planting dates can vary by climate. Therefore, verify seasonal advice with a current horticultural source before planting.
Subscribe to the blog and newsletter to get new updates in simple, clear words straight to your inbox.
Recent Articles
Related Articles
Keengarden is your simple, friendly guide to growing healthy plants, fixing garden problems, and choosing the right tools.
© 2025 keengarden. All rights reserved. Designed by Affpilot