
Gardening Made Simple.
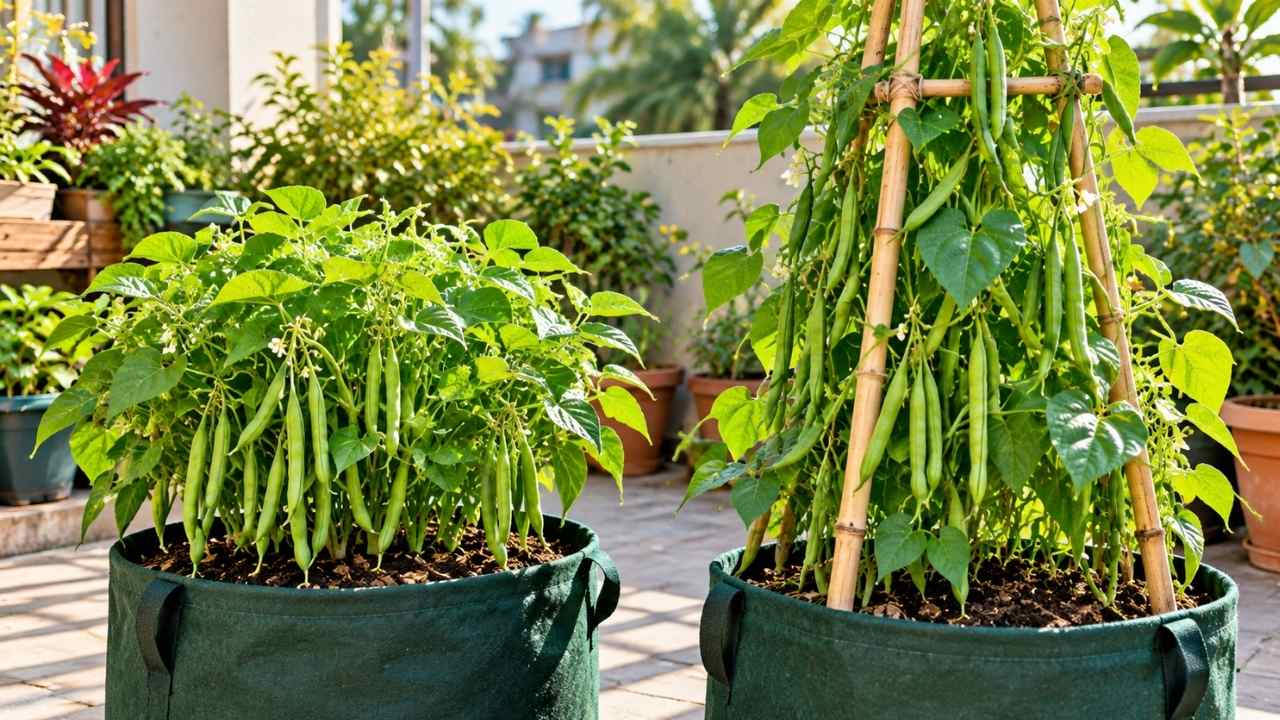
How to grow green beans in pots becomes much easier when the container, bean variety, sunlight, and watering routine match the plant’s needs. For compact spaces, bush beans are practical because they stay short and need no support. By contrast, pole beans produce climbing vines, so they need a trellis, bamboo stake teepee, or netting.
First, use a container at least 9 to 15 inches wide and 9 to 10 inches deep. A 5-to-10-gallon fabric grow bag also works well. Fill it with a loose mix of two-thirds quality potting soil and one-third compost, then sow seeds after the last frost danger has passed.
For broader container-gardening guidance, the Royal Horticultural Society’s bean-growing advice is a useful reference. However, the practical details below focus on choosing the right pot, planting correctly, and keeping a small crop productive.
To grow green beans in pots, select a container with enough width for the root zone and enough depth for steady moisture. In practice, a pot measuring 9 to 15 inches wide and 9 to 10 inches deep is a useful minimum range. A 5-to-10-gallon fabric grow bag offers additional planting space and good drainage.
Next, choose the bean type before buying seeds. Bush beans remain short, mature quickly, and do not need a trellis. In contrast, pole beans climb several feet and require a bamboo stake teepee, trellis, or netting. As a result, that choice affects both the container position and the support structure.
Place the pot where it receives at least 6 to 8 hours of direct sunlight. However, in extreme summer heat above 90°F, some afternoon shade can protect flowers and foliage from stress. Good airflow also helps the leaves dry after watering.
Bush beans are usually the simpler option for a first container crop. They fit smaller pots, window boxes, and balconies with limited vertical clearance. Pole beans make better use of vertical space, but their support must be stable enough to handle a leafy vine and a crop of pods.
| Bean type | Best container situation | Support required | Main advantage |
|---|---|---|---|
| Bush beans | Smaller pots or window boxes | No trellis needed | Short and fast-growing |
| Pole beans | Large pots with vertical room | Bamboo teepee, trellis, or netting | Uses height efficiently |
A useful rule is simple: choose bush beans when floor space is limited, and choose pole beans when height is available. However, do not place a pole bean in an open pot without support. The vine can become difficult to manage once it starts climbing.
The best container for green beans is at least 9 to 15 inches wide and 9 to 10 inches deep. Alternatively, a 5-to-10-gallon fabric grow bag is another suitable choice because it provides room for roots while allowing excess water to drain through the sides.
Container volume matters because pots dry faster than garden soil. A small container can support a few plants, but it may need more frequent watering during bright, windy weather. Larger pots usually hold moisture for longer and give the roots more room to explore.
Every container must have drainage openings. Otherwise, water can remain trapped around the roots, causing the growing mix to become soggy and reducing root health. Therefore, place the pot on a surface where excess water can escape freely.
For a 10-gallon pot, plant about 3 to 4 bush bean plants. Alternatively, space seeds roughly 4 to 6 inches apart. This arrangement gives each plant room without leaving large areas of unused soil.
For example, a 10-gallon container can hold a small group of bush beans for a compact harvest. Meanwhile, a pole bean container should also leave room for the support structure, which may occupy space above or around the pot.
Fabric grow bags can be convenient on patios because they are lighter than many rigid containers. However, their porous sides may dry faster. For that reason, check the mix regularly rather than relying on a fixed watering schedule.
Use a rich, loose, free-draining mix made from two-thirds quality potting soil and one-third compost. This combination supplies structure, organic matter, and enough drainage for container-grown beans. In contrast, dense garden soil by itself can compact inside a pot.
Mix the ingredients evenly before filling the container. Then, leave a small gap below the rim so water does not wash soil over the sides. A level surface also makes it easier to sow seeds at a consistent depth.
Beans fix their own nitrogen, so heavy nitrogen fertilizer is unnecessary. In fact, too much nitrogen can encourage leafy growth instead of a balanced crop. Once pods begin forming, a light side-dressing with potassium or vegetable fertilizer may be appropriate.
Direct-sow green bean seeds after the last frost danger has passed. The soil should be warm, with a temperature of at least 60° to 70°F. Otherwise, cold and wet conditions can slow germination and make early growth less reliable.
Direct sowing avoids unnecessary root disturbance. Therefore, green bean seeds are best placed directly in their final container rather than moved repeatedly between small pots. If the weather is still cool, wait until the growing mix reaches the recommended temperature.
Green beans need at least 6 to 8 hours of direct sunlight each day. Full sun supports stronger growth and helps the plants produce flowers and pods. However, when extreme summer heat rises above 90°F, afternoon shade can reduce heat stress.
Keep the potting mix moist but not soggy. Water when the top inch of soil has dried out. In particular, check the surface with a finger during hot or windy periods when containers can lose moisture quickly.
Water slowly until moisture reaches the lower part of the container. Then allow excess water to drain. Frequent shallow wetting of only the surface can leave deeper roots dry, while constant saturation can create a different problem.
A thin layer of mulch around the plant base helps slow moisture loss. Still, keep the mulch slightly away from the stems so air can circulate at soil level. Mulch is particularly useful in fabric grow bags, which may dry faster than rigid plastic pots.
A practical routine is to inspect the top inch of soil each morning during hot weather. If it feels dry, water the container. During cooler or cloudy conditions, the same pot may need water less often.
Sun exposure also affects watering demand. For example, a pot receiving 8 hours of direct light may dry sooner than one receiving 6 hours, especially on a warm balcony. Therefore, adjust the frequency according to the soil rather than the calendar.
Green beans generally do not need heavy nitrogen fertilizer because the plants fix their own nitrogen. Instead, focus first on a fertile potting mix containing compost. Excess nitrogen can produce abundant foliage without supporting the best pod production.
When the plants start setting fruit, apply a light side-dressing of potassium or vegetable fertilizer. Always follow the product label for the application rate. Also, avoid placing concentrated fertilizer directly against the stems or roots.
Fertilizer is not a substitute for sunlight, water, or suitable soil. If a plant is struggling because the container is shaded or waterlogged, adding more feed will not correct the underlying problem.
For a small container crop, moderation is usually more useful than frequent feeding. Overall, a rich mix, steady moisture, and adequate light create the foundation for flowers and pods.
Most container-growing problems begin with a mismatch between the plant and its growing conditions. For example, a small pot may dry quickly, a pole bean may lack support, or dense soil may hold too much water. Therefore, identifying the cause is more useful than adding a random treatment.
| Problem | Likely cause | Practical adjustment |
|---|---|---|
| Dry soil at the surface | Small container, heat, or wind | Check the top inch more often and use mulch |
| Weak climbing growth | Missing or unstable support | Add a teepee, trellis, or netting early |
| Many leaves but few pods | Excess nitrogen or insufficient light | Reduce nitrogen and confirm 6 to 8 hours of sun |
| Waterlogged mix | Poor drainage or overwatering | Use drainage holes and water only when needed |
A common mistake is waiting until pole bean vines are large before adding support. Instead, install the bamboo stake teepee, trellis, or netting when planting. Early support lets the young vines climb naturally and reduces tangling.
Another mistake is harvesting too late. Pods become less tender as the seeds enlarge. Consequently, check the plants frequently once flowers appear, particularly because regular picking encourages new flowers and more beans.
Green beans are often ready to harvest in about 45 to 60 days. Pick the pods when they are young and tender, before the seeds bulge noticeably. At this stage, the texture is usually better than that of pods left to mature on the plant.
Harvest frequently rather than waiting for every pod to reach the same size. Regular picking encourages the plants to produce new flowers and more beans. To avoid damage, use one hand to hold the vine and the other to remove the pod gently.
Inspect bush and pole beans every day or two during peak production. A single missed pod can become large and tough while younger pods continue developing nearby. Therefore, remove overmature pods so the plant remains focused on continued production.
For a gradual container harvest, begin with one pot of bush beans. Once the routine feels manageable, add a pole bean container with vertical support. This small-scale approach makes it easier to compare watering needs, sunlight exposure, and harvest frequency.
The strongest results come from treating the container as a complete growing system. Pot size, soil texture, support, light, and harvest timing affect one another. As a result, a suitable seed variety cannot compensate for a container that stays soggy or a location that receives too little direct light.
Container placement deserves special attention. For instance, a pot beside a bright wall may receive more reflected heat than expected, while a balcony railing can increase wind exposure. Monitor the soil and foliage, then adjust watering or afternoon shade as conditions change.
The clearest decision is often the simplest one: start with bush beans in a 10-gallon pot if you want a low-support crop. On the other hand, use pole beans when a stable trellis or teepee can be positioned safely above the container.
Yes. Green beans grow well in containers when the pot is at least 9 to 15 inches wide and 9 to 10 inches deep, with good drainage, warm soil, sunlight, and regular moisture.
A 5-to-10-gallon fabric grow bag is a practical choice. Alternatively, a container at least 9 to 15 inches wide and 9 to 10 inches deep can support a small planting.
Bush beans are easier for smaller pots because they stay short and need no trellis. However, pole beans suit containers with enough vertical room for a teepee, trellis, or netting.
Plant about 3 to 4 bush bean plants in a 10-gallon pot. Seeds can also be spaced roughly 4 to 6 inches apart for roomier growth.
Push the seeds about 1 inch deep into the potting mix. Sow them after the last frost danger has passed when the soil reaches at least 60° to 70°F.
Water when the top inch of soil dries out. Keep the mix moist but not soggy, and use mulch around the base to slow moisture loss.
Beans fix their own nitrogen, so heavy nitrogen fertilizer is not needed. When pods begin forming, a light side-dressing with potassium or vegetable fertilizer may help.
Pods are usually ready in about 45 to 60 days. Pick them young and tender before the seeds bulge, then harvest frequently to encourage more flowers and beans.
Growing green beans in pots is a manageable project when the container and bean type are chosen together. Start with bush beans for a compact setup, or select pole beans when a sturdy support can use the available height.
Use the recommended soil mix, wait for warm conditions, provide 6 to 8 hours of direct light, and check moisture at the top inch. Once pods appear, frequent harvesting becomes the main task.
Before planting, confirm the local last-frost timing and adjust the container position for heat and wind. Last checked: October. Because container conditions can change quickly, observe the soil rather than following a rigid watering timetable.
Subscribe to the blog and newsletter to get new updates in simple, clear words straight to your inbox.
Recent Articles
Related Articles
Keengarden is your simple, friendly guide to growing healthy plants, fixing garden problems, and choosing the right tools.
© 2025 keengarden. All rights reserved. Designed by Affpilot