
Gardening Made Simple.
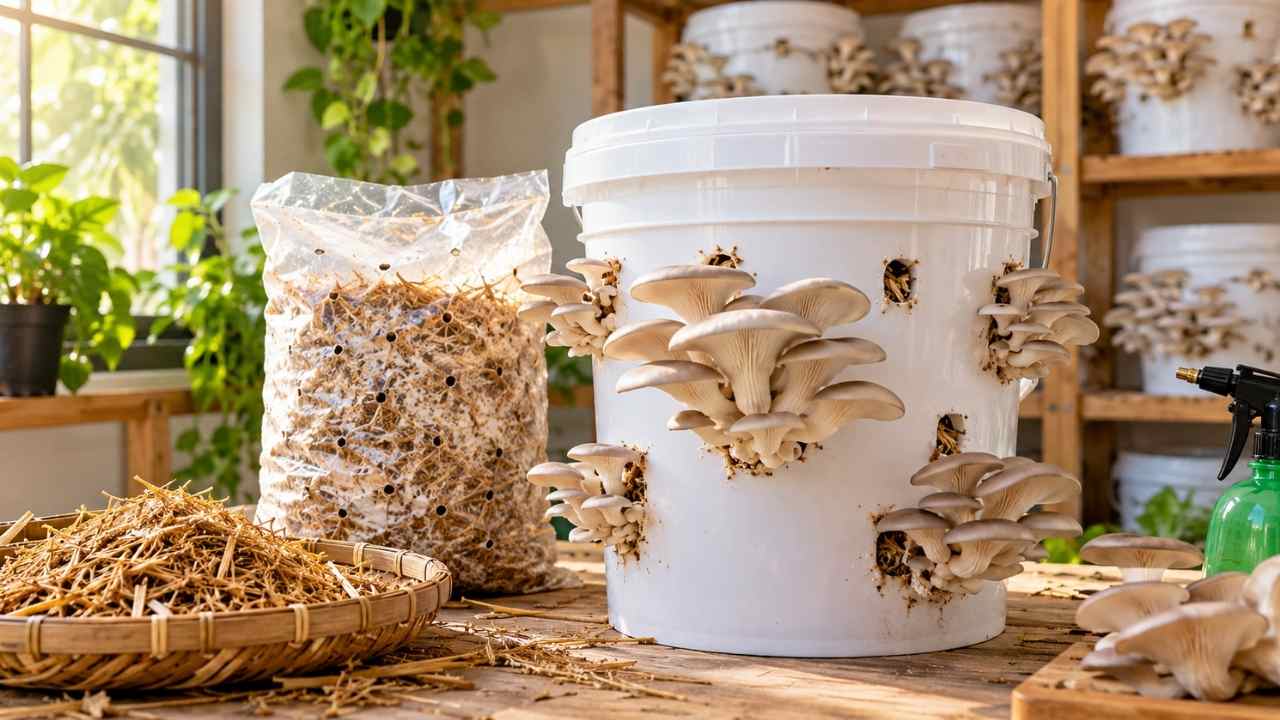
How to grow oyster mushrooms at home is often described as a specialist project, but the basic method is surprisingly manageable. In practice, a clean bucket or perforated grow bag, pasteurised straw or coffee grounds, oyster mushroom spawn, moisture and fresh air are the main requirements. The difficult part is not growing the mushrooms. Instead, it is preventing contamination while the mycelium colonises the substrate.
Two common mistakes cause most failed attempts: using substrate that is too wet and opening the container before the white mycelium has fully spread. Fortunately, a careful routine solves both problems. The method below covers preparation, incubation, fruiting, harvesting, common errors and practical choices for a small indoor setup.
Quick summary: First, pasteurise the substrate at approximately 160°F–180°F for 1.5 to 2 hours. Then let it cool fully before mixing it with spawn. Colonisation usually takes about 2 to 4 weeks at roughly 70°F–75°F. After full colonisation, provide indirect light, 80%–90% humidity and regular misting.
To grow oyster mushrooms at home, prepare a clean substrate, combine it with mushroom spawn, allow the mycelium to colonise the container and then introduce fresh air and humidity for fruiting. A 5-gallon bucket with small holes or a perforated plastic bag works well because it holds the growing medium while giving mushrooms controlled fruiting points.
However, the most useful distinction is between spawn and substrate. Spawn is not a seed in the botanical sense. Instead, it is grain already covered with oyster mushroom mycelium. The substrate provides the material that the mycelium will colonise. Straw is a practical beginner choice, while woodchips and spent coffee grounds can suit other setups when prepared correctly.
For reliable preparation, use clean equipment and keep the substrate damp rather than saturated. When squeezed, it should hold together briefly without releasing a stream of water. Therefore, that simple moisture check is more useful than guessing from appearance alone.
Read More: How to grow ginger at home
A basic setup needs only a few items. First, prepare chopped straw, woodchips or spent coffee grounds; oyster mushroom spawn; a clean 5-gallon bucket or grow bag; 70% isopropyl alcohol; a spray bottle and micropore tape. In addition, a thermometer is helpful because the pasteurisation and incubation ranges are temperature-sensitive.
| Item | Purpose | Practical note |
|---|---|---|
| Chopped straw | Growing medium for mycelium | Drain it thoroughly after hot-water treatment |
| Oyster mushroom spawn | Introduces living mycelium | Use fresh, clean spawn from a reputable supplier |
| 5-gallon bucket | Holds the substrate | Small holes create fruiting points |
| Micropore tape | Temporarily covers bucket holes | Remove it when fruiting begins |
| Spray bottle | Maintains surface moisture | Use clean water and avoid soaking the block |
Straw is usually the clearest starting point because it is easy to identify, simple to chop and suitable for hot-water pasteurisation. Woodchips can also work, while spent coffee grounds may be convenient when used promptly and kept clean. Ultimately, the best option depends on what you can prepare consistently, not simply on what is cheapest.
A bucket provides a rigid structure and predictable hole placement. By contrast, a perforated grow bag is lighter and easier to scale, but it can be harder to handle once filled. In either case, the container must allow limited gas exchange during colonisation and more fresh air during fruiting.
For a first attempt, avoid mixing several substrates together. One clearly prepared medium makes it easier to identify whether a problem came from moisture, temperature or contamination. This is especially useful when an advanced grower is trying to improve consistency rather than merely produce one successful harvest.
| Choice | Advantages | Limitations | Best fit |
|---|---|---|---|
| Straw in a bucket | Structured, inexpensive and easy to inspect | Requires chopping and hole preparation | First indoor project |
| Straw in a grow bag | Lightweight and convenient for multiple blocks | Less rigid during handling | Small batches |
| Woodchips | Useful for a more woody growing medium | Preparation and moisture control can be less forgiving | Growers with suitable materials |
| Spent coffee grounds | Convenient when available fresh | Can compact and retain excess moisture | Careful, small-scale trials |
For readers comparing varieties, the Black Pearl Oyster Mushroom is a useful example of how oyster mushroom types can differ in appearance and growing characteristics. Even so, variety choice does not remove the need for clean handling, suitable moisture or fresh air.
Place the chopped straw or chosen substrate in hot water at approximately 160°F–180°F for 1.5 to 2 hours. This treatment reduces competing moulds and bacteria without relying on a completely sterile home environment. When the time is complete, drain the substrate thoroughly and wait until it reaches room temperature before adding spawn.
Adding spawn while the substrate is still hot is a serious mistake because heat can damage the living mycelium. For that reason, a clean tray or container can help the prepared material cool evenly. Do not rush this stage simply because the substrate looks ready on the surface; the centre may remain warm.
During colonisation, the mycelium spreads through the prepared substrate before mushrooms appear. Initially, keep the filled bucket or bag in a dark, room-temperature location at roughly 70°F–75°F for about 2 to 4 weeks. The container should remain undisturbed while the white, fuzzy mycelium gradually takes over the growing medium.
Once the substrate is fully colonised, remove the micropore tape from the bucket holes or open the relevant areas of the grow bag. Next, move the setup to a place with indirect light and high humidity, approximately 80%–90%. Oyster mushrooms need fresh air at this stage, so a sealed container is no longer suitable.
Then mist the openings 2 to 5 times a day with clean water. The goal is a humid surface, not standing water. Small pins can develop quickly after the fruiting conditions improve. If the surface dries between misting sessions, humidity may be too low; however, if water pools heavily, ventilation or watering may need adjustment.
A fully white block is generally a better sign than a calendar date. Therefore, if substantial areas remain uncolonised after the expected 2-to-4-week period, check temperature, moisture and cleanliness before exposing the container to fruiting conditions.
Harvest oyster mushrooms within about 5 to 7 days of pinning, ideally before the cap edges curl upward or flatten completely. Twist the cluster from the base rather than pulling individual caps away one at a time. As a result, removing the whole cluster leaves a cleaner fruiting point and reduces loose material around the opening.
The same bucket or block may produce multiple flushes over several weeks. Between flushes, keep the substrate from drying out, but do not flood it. Notably, the first flush often provides the clearest indication of whether the moisture and fresh-air routine is balanced.
The most common mistake is treating cleanliness as optional. A home growing area does not need to resemble a laboratory, yet hands, containers and tools should be sanitised with 70% isopropyl alcohol before inoculation. In addition, the substrate should be pasteurised and cooled fully before it touches the spawn.
Another frequent error is opening the container too early. During colonisation, the mycelium benefits from a protected environment. Consequently, exposing a partly colonised block to high humidity and fresh air can encourage unwanted growth before the oyster mushroom mycelium has established itself.
Do not use a container that cannot be cleaned properly. Likewise, do not rely on a fixed misting number if the room changes significantly. The stated range of 2 to 5 mistings daily is a starting point; instead, the visible condition of the fruiting surface remains the better guide.
A bucket or bag method may not suit someone who cannot maintain a clean preparation area, stable room temperature or regular humidity checks. It is also less suitable when the growing space is exposed to heavy dust, direct sun or strong drafts. In those conditions, a ready-to-fruit block may be simpler than preparing substrate from scratch.
Anyone with mould sensitivity should avoid disturbing visibly contaminated material and should follow sensible household ventilation practices. Also, keep growing materials away from food preparation surfaces during inoculation. When in doubt about contamination, consult the supplier of the spawn rather than attempting to salvage an uncertain block.
Before mixing anything, confirm that the substrate is cool, drained and evenly prepared. Next, clean the vessel, sanitise hands and tools, and arrange the spawn so the mixing process is quick. A written checklist reduces the chance of forgetting a small but important step, especially when preparing more than one container.
For general background on mushroom cultivation methods and terminology, compare supplier instructions with established educational resources such as Mushroom Mountain’s cultivation resources. However, supplier directions can vary by spawn type, so follow the instructions that came with the specific product whenever they differ from a general home method.
Yes. Use a clean perforated grow bag, fill it with cooled pasteurised substrate and oyster mushroom spawn, then keep it closed during colonisation. Afterward, open the fruiting points once the substrate turns fully white.
Colonisation commonly takes about 2 to 4 weeks when the container stays near 70°F–75°F. Before fruiting begins, the substrate should be mostly or completely covered with white mycelium.
Mist the fruiting openings about 2 to 5 times daily with clean water. Adjust the routine if the surface dries quickly or becomes visibly waterlogged.
Direct sunlight is unnecessary. During colonisation, keep the container in a dark space. During fruiting, provide indirect light along with high humidity and fresh-air exchange.
Harvest around 5 to 7 days after pinning, before the cap edges curl upward or flatten completely. Then twist each cluster off at the base for a clean harvest.
A colonised block or bucket can produce multiple flushes over several weeks. Between flushes, keep the substrate moist without flooding it or allowing standing water.
Spent coffee grounds can be used, but they may compact and hold excess moisture. Therefore, work carefully with small quantities and maintain clean handling throughout preparation.
The bucket and grow-bag methods work because they separate the process into two clear stages: protected colonisation followed by humid, well-ventilated fruiting. First, pasteurise the substrate, cool it completely and pack it with spawn. Then wait for full white colonisation before changing the conditions.
Keep the process simple during the first attempt. Meanwhile, record the substrate used, room temperature, misting frequency and the time from pinning to harvest. Those notes make the next batch easier to adjust without guessing.
Information check and update: Spawn availability, supplier instructions and recommended growing conditions can change. Temperature and humidity ranges should also be checked against the product guidance.
Subscribe to the blog and newsletter to get new updates in simple, clear words straight to your inbox.
Recent Articles
Related Articles
Keengarden is your simple, friendly guide to growing healthy plants, fixing garden problems, and choosing the right tools.
© 2025 keengarden. All rights reserved. Designed by Affpilot